Every business relies on its website.
And yet, many founders only realize something is wrong when someone texts:
“Hey… is your website down?”
By that time, you may already have lost revenue, missed leads, and damaged trust. Most uptime monitoring tools help with this, but they come with monthly subscriptions, limited alerts in free plans, and SMS or Slack/Teams support locked behind premium tiers.
What if you could build your own monitoring system on AWS — in under an hour — for almost zero cost?
In this guide, you’ll see how to create a production‑ready website monitoring and alerting system using:
- AWS Lambda
- Amazon EventBridge
- Amazon SNS
You’ll also get working code so you can implement it yourself.
💡 The Real-World Problem
Most businesses don’t need complex dashboards or deep synthetic monitoring.
They just need three simple things:
✅ “If my site goes down, tell me immediately.”
✅ Send alerts via SMS, Email, Slack, or Teams.
✅ Keep the cost extremely low.
Instead of paying ₹1,000–₹10,000 per month for a third‑party tool, we’ll build this natively on AWS using serverless components.
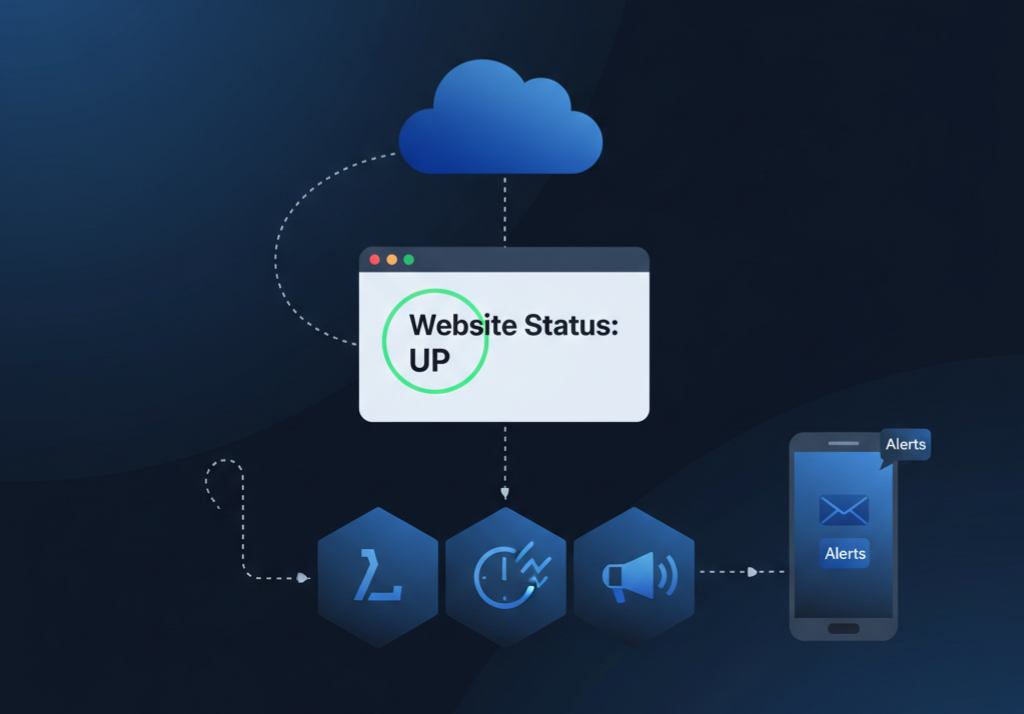
🏗 Architecture: Simple but Powerful
Here’s how the system works end‑to‑end:
- Amazon EventBridge runs on a schedule (for example, every 5–15 minutes).
- It triggers an AWS Lambda function.
- The Lambda function checks your website URL.
- If the site is down or responding too slowly, Lambda sends a message to Amazon SNS.
- Amazon SNS forwards that message to: SMS Email Slack (via webhook), Microsoft Teams (via webhook)
undefined
This is a fully serverless design:
- No servers to manage.
- No background jobs to maintain.
- No agents to install.
💰 Cost Breakdown
For 1–3 websites checked every 15 minutes, you typically get:
- Lambda → Usually within the free tier for light workloads.
- EventBridge → Very low cost for simple schedules.
- SNS → You only pay for SMS usage; email and webhooks are effectively near‑free.
For most small setups, the total monthly cost is negligible compared to standard uptime tools.
🎯 Why This Can Beat Many Paid Tools
This AWS-based setup can outperform many paid monitoring tools in several important ways. For light usage, the cost is close to zero instead of a recurring monthly subscription. It is fully customizable in code, whereas typical SaaS tools usually offer only limited configuration options. You get direct SMS alerts through SNS rather than having SMS locked behind premium plans. All of this runs entirely inside your own AWS account, so you keep full ownership instead of depending on an external vendor. On top of that, you can add any logic or integration you need, while SaaS tools are constrained by whatever features the provider offers. For startups, agencies, and AWS‑native teams, this means far more control at just a fraction of the usual cost.
🔧 Step-by-Step Implementation (With Code)
Let’s walk through the complete setup so you can follow along and deploy this in your own AWS account.
Step 1 — Create an SNS Topic (Your Alert Channel)
- Open the AWS Management Console and go to Amazon SNS.
- Click Topics → Create topic.
- Choose Standard.
- Name it something like: website-alert.
- Click Create topic.
- Now add one or more subscriptions (where alerts will go):
- Inside your website-alert topic, click Create subscription.
- Choose Protocol:
- Email – to receive alerts in your inbox
- SMS – to receive alerts on your phone (e.g., +91XXXXXXXXXX)
- HTTPS – for Slack or Microsoft Teams webhooks
- Enter the Endpoint (email address, phone number, or webhook URL).
- Click Create subscription.
- For email, open your inbox and confirm the subscription link.
Finally, copy the Topic ARN of website-alert. You’ll use it in your Lambda configuration.
Step 2 — Create the Lambda Function
- In the AWS Console, go to AWS Lambda.
- Click Create function.
- Choose:
- Name: website-monitor
- Runtime: Python 3.x
- Permissions: create a new role or use an existing one
4. Click Create function.
Now replace the default Lambda code with this:
import urllib.request
import boto3
import os
from datetime import datetime
import json
sns = boto3.client('sns')
TOPIC_ARN = os.environ['SNS_TOPIC_ARN']
URL = os.environ['URL_TO_CHECK']
TIMEOUT = int(os.environ.get('TIMEOUT', 10))
RESPONSE_THRESHOLD = float(os.environ.get('RESPONSE_THRESHOLD', 3))
def lambda_handler(event, context):
start_time = datetime.utcnow()
try:
# Try to open the website
response = urllib.request.urlopen(URL, timeout=TIMEOUT)
status_code = response.getcode()
# Calculate response time
response_time = (datetime.utcnow() - start_time).total_seconds()
# Case 1: Non-200 status code
if status_code != 200:
send_alert(f"Non-200 response: {status_code}")
return
# Case 2: Site is up but slow
if response_time > RESPONSE_THRESHOLD:
send_alert(f"Slow response: {response_time} seconds")
return
# Healthy case
print("Website is healthy")
except Exception as e:
# Any error: timeout, DNS failure, SSL issue, etc.
send_alert(str(e))
def send_alert(error_message):
message = f"""
🚨 WEBSITE DOWN ALERT 🚨
URL: {URL}
Time (UTC): {datetime.utcnow()}
Error: {error_message}
"""
sns.publish(
TopicArn=TOPIC_ARN,
Message=message,
Subject="Website Down Alert"
)
5. Click Deploy to save your changes.
This function checks your website, alerts when the HTTP status is not 200.
Step 3 — Configure Environment Variables
We want to avoid hard‑coding values in the code and keep it easy to tweak.
- In your Lambda function, go to Configuration → Environment variables.
- Click Edit, then Add environment variable and add:
SNS_TOPIC_ARN Your SNS Topic ARN (for website-alert)
URL_TO_CHECK https://yourdomain.com
TIMEOUT 10
RESPONSE_THRESHOLD
3.Click Save.
This makes your function reusable and configurable without changing the code.
Step 4 — Allow Lambda to Publish to SNS
Your Lambda function needs permission to send messages to SNS.
- In the Lambda console, open your function and go to Configuration → Permissions.
- Under Execution role, click the role name. This opens the IAM console.
- Add an inline policy (or attach a policy) with the following JSON, replacing REGION, ACCOUNT_ID, and topic name if needed:
json
{
"Version": "2012-10-17",
"Statement": [
{
"Effect": "Allow",
"Action": "sns:Publish",
"Resource": "arn:aws:sns:REGION:ACCOUNT_ID:website-alert"
}
]
}
4. Save the policy.
Now your Lambda function can successfully publish alerts to the SNS topic.
Step 5 — Schedule Monitoring with EventBridge
Next, set up automatic checks using Amazon EventBridge.
- Open Amazon EventBridge in the AWS console.
- Click Rules → Create rule.
- Give it a name, for example: website-monitor-schedule.
- Rule type: select Schedule.
- Under Schedule pattern, choose Rate expression and set:
rate(15 minutes)
(You can change this to 5 minutes or even 1 minute based on your needs and budget.)
6. Under Target:
- Target type: AWS service
- Service: Lambda
- Function: website-monitor
7. Click Create rule.
Your website is now monitored automatically on the schedule you defined.
🏁 Final Thoughts
You don’t need expensive uptime monitoring software to protect your business.
With AWS Lambda, Amazon EventBridge and Amazon SNS you can build your own monitoring system that is:
✅ Cheap
✅ Scalable
✅ Fully customizable
✅ Production‑ready
And now you have the exact steps and code to implement it yourself.
Spin this up once, and let it silently watch your website — so the next downtime alert comes from your system, not from your customers.